THE EXTENSION STARTS FROM THE FOUNDATION
Any construction begins with a foundation.
The strength of the house as a whole depends on how strong the foundation is. But do you always need an expensive and powerful foundation, or in some cases you can get by with lighter and more economical ones? Basic rules
To begin with, I should note that the dimensions of the foundation and its design depend on the following conditions:
EVERYTHING YOU NEED FOR THIS ARTICLE IS HERE >>>
- the soil on which you are going to build the structure;
- proximity to a natural body of water;
- the location of your site on the ground, that is, in a lowland where melt water will flow in the spring, or on a hill where most of the year the soil dries out quickly;
- the material from which the extension will be built on this foundation and the weight of this material.
How to legalize an extension to a house on privatized land in 2020
Registration fees will depend on the area where the land plot is located. If you decide to seek help or advice from a lawyer, you must pay for his services. The cost of legal services depends on the assistance provided (consultation, collection of documents, court hearings).
Interesting: Matkapital for a Mortgage in Another City
The statement of claim must be accompanied by documentation drawn up by a cadastral engineer during an on-site inspection of the property, as well as acts of approval from specialized institutions - architectural authorities, fire supervision, Rospotrebnadzor authorities, gas services, etc.
IF THE EXTENSION IS FROM WOOD
If the extension is made of timber measuring, for example, 150 x 150 mm, the height of the walls is about 3-4 m, that is, the structure is one-story, then the basis of such a structure can be the following design: concrete pillars are poured at the corners of the foundation to a depth of about 150 cm, and the their concrete strip is about 50 cm deep. It all depends on the length of the foundation: the longer it is, the more often the pillars need to be installed - say, every 150 cm. In any case, it will be a so-called strip foundation.
The difference between the depth of the trench under the pillars and under the tape is a matter of saving on materials for the foundation.
In this case, you can afford this kind of savings, since the structure is supposed to be quite light. The depth of the pillars is provided for central Russia, where soil freezing in severe winters reaches 150 cm.
And for reliability, it is better to tie the pillars together, otherwise in the spring during the thaw and after it they can “walk” both to the sides and in height. This “walking” depends on both the freezing of the soil and its composition.
If the soil is sandy and the sand layer is at least 2 m, then moisture will seep through it quickly. And if there is a lot of clay in the soil or it generally consists only of it, then in the fall a lot of moisture will accumulate around the foundation, which in winter will turn into ice and literally squeeze out
foundation up. In this case, each pillar will be squeezed out differently, that is, live its own life. So tying the pillars together is far from unnecessary.
Let me give you a clear example: at a friend’s dacha near the Mozhaisk Reservoir, a fence consisting of brick pillars and metal sheets fell down several springs in a row. It turned out that they saved on the depth of the foundation under the pillars and did not connect them together. As a result, we lost it on bricks and corrugated sheets. But on clay and mixed soil, a 150-cm trench depth for the foundation is not enough. Under it you need to make a cushion from a mixture of sand and crushed stone from 10 to 20 cm so that the moisture still leaves.
I don’t want to talk about using iron pillars as a base for the structure. And it doesn’t matter whether they are dug in or screwed into the ground. It’s one thing if you are adding a veranda or summer terrace to your house. And another thing is if you are going to live in this extension all year round.
The summer version of the extension can also be installed on poles without subsequent tying with a plinth. But the winter one, in my opinion, should include the construction of a base on a strip foundation with a height of at least 40 cm made of concrete poured into a pre-constructed formwork made of boards.
Important!
If the extension is being built on a gentle slope, then the height of the plinth 40 cm should be on the highest side of the slope, and at the lowest point - what will be the horizontal level: 50-100 cm or more.
It is necessary to provide a pair of holes in the base on two opposite sides so that the space between the ground and the future floor of the extension is well ventilated and the floor does not become damp.
If the floor is made of boards, then without ventilation they will simply rot over time before the floor collapses. There will be a rather unpleasant and harmful smell of mold in the room for several years. Holes, or otherwise vents, can be made from plastic sewer pipes with a diameter of 10 cm. Before pouring concrete, placing them in the formwork at a height from the ground that prevents water flows from entering during rain and melting snow. For the winter, it is convenient to close them with plastic caps so that cold air does not enter the room through the floor. The width of the foundation for the construction of an extension made of timber on it is sufficiently 30-35 cm, taking into account possible insulation and cladding of the building, say, siding.
How to legalize an extension to a house on your own land before and after construction
The judge must make sure that the erected structure does not pose a danger to anyone and does not affect the rights and legitimate interests of other persons. If a positive decision is made on the case, further actions can be taken, that is, changes made can be registered.
- drawings that comply with legal requirements;
- title documents for the house - sales contract, deed of gift, certificate of inheritance, etc.;
- home Book;
- technical documentation from BTI;
- other papers on request.
Interesting: Can taxes on individual entrepreneurs be applied to a priest from his salary?
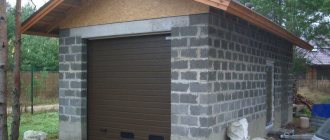
IF THE EXTENSION IS MADE OF FOAM CONCRETE
If the extension is made of foam block or brick, then the foundation must be stronger: at least 150-180 cm deep and at least 40 cm wide. When calculating the width of the foundation, you should also take into account how you will decorate the outer walls of the building and whether you will insulate them and what materials (Fig. 1).
Before pouring concrete into the prepared trench, you need to install a metal skeleton made of reinforcement in it.
For an extension, fittings with a diameter of 10-12 mm are quite suitable. Around the base it would be useful to pour a concrete blind area at least 50 cm wide and 10 cm thick. Having previously created a cushion of sand and crushed stone under it and covered it with a metal mesh for reinforcement. The blind area will further protect the foundation from the penetration of large amounts of water. Typically, cement or concrete made from M300 cement is used for the foundation.
THERE ARE OPTIONS
I would like to give you two examples of creating a foundation for an extension to a residential building on a personal plot.
The first example is my personal one. I am a native villager. The second example is my neighbor, a professional builder with a higher education. Under his leadership, a lot of land was dug up in the near and far Moscow region to fill the foundations. Which example is more suitable is up to you to decide. Or you can take both into account and combine them.
How to properly register an extension to a private house
- The homeowner is planning to build an extension. If a home owner plans to add an extension to a residential property, he should seek help from a legal adviser to resolve the issue in accordance with all legal norms. After deciding the legal side of the law, it is necessary to use the services of a designer.
- A project for construction is drawn up, which is certified by local authorities. The project must be drawn up taking into account all legal requirements. After completing the above steps, you can begin collecting documentation and completing the registration procedure.
IMPORTANT! If the building is not properly registered and interferes with neighbors, or does not comply with legal requirements, the illegal extension may be required to be demolished. The owner will have to not only disassemble it on his own, but also pay a fine, which will ultimately amount to a large sum.
OPTION ONE
Now I’ll tell you how I made the foundation for my house. Naturally, not alone, but with assistants. It was planned to install a structure made of foam blocks on the foundation. Respectively. The dimensions of the foundation were determined by the dimensions of this material. It must be said that foam concrete from Belarus was a fairly light building material compared to brick.
First, we dug a trench 160 cm deep and 50 cm wide. Our soil is sandy, but there are also layers of clay.
I covered the bottom of the trench with a small (about 10 cm) layer of clean sand - that's it. for peace of mind. Then, at the corners of the trench and approximately every one and a half meters between the corners, I inserted poles 2 m high, pre-made from reinforcement, taking into account the fact that after pouring the foundation, the base will be poured. The height of the base must be calculated in advance. It’s better to cut down the excess reinforcement later than to build it up.
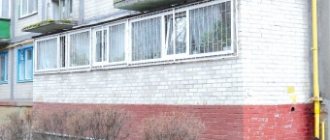
But I still had to build it up, since I made the pillars the same size, forgetting that I had a slope (Fig. 2).
The pillars have the following structure: four two-meter sticks of reinforcement are connected to each other at the bottom, top and in the middle by four short pieces of reinforcement 45 cm long. Each is in the shape of a square - so that they protrude 5 cm on each side. Thus, the distance between the two-meter reinforcement was 35 cm on each of the four sides of the pillar.
All connections are made using binding wire and nothing else. Connections made by welding may look more beautiful and reliable. but in damp conditions, the reinforcement will begin to rot at the welding points, and over time corrosion will destroy it.
DO-IT-OWN HOUSE EXTENSION WALLS
Against the background of a wooden house, an extension made of brick or foam block, covered with fur coat plaster, would look good, and vice versa, a structure made of rounded logs would be quite suitable for a brick house.
In my opinion, an extension made of logs with a diameter of 20-25 cm is the best that can be invented throughout Russia. The structure is made of good quality dry logs, tightly folded and caulked with tow, and does not require additional insulation. In winter, it will be comfortable even in severe frosts, and in the summer heat, if you do not open the windows, the pleasant coolness will remain from morning to evening. This, of course, is provided that there is a well-insulated roof.
Before building walls, waterproofing must be laid on the foundation. This measure is necessary regardless of the wall material. If they are made of timber or logs, then the lowest elements (crown) should be additionally treated with bitumen.
The walls of the extension do not have to be built from the same material from which the main building is built. It all depends on individual taste and financial capabilities.
Brick and foam blocks
The material is laid on cement mortar or special glue and after drying it becomes almost monolithic. To attach to the wall of the main house, if both the house and the extension are, for example, brick, it is enough to install a metal plaster mesh bent in half every five rows of masonry.
One half of it will be in the masonry of the extension, and the other will be attached to the wall of the main house using dowels. The seam between the walls of the extension and the main house is sealed during the laying process with the same cement mixture used for laying bricks. The walls of the foam block extension are joined using the same scheme. In this case, the mesh is laid every two foam blocks. In the same way, brick or foam block masonry is attached to a wooden wall, only the seam between the walls is filled with polyurethane foam.
Permission to build a house on your own plot in 2020: when you need it, how to get it
Hello! I applied for permission to build a residential building, but I was refused. The text indicated that as of August 4 of last year, the document was no longer required. In the end, I didn’t understand whether it was possible to start construction?
How much does the required paperwork cost? There is no cost to submit the notice, which is valid for 2020. But you will have to make approvals, draw up additional papers (SPOZU and GPZU), which leads to expenses. Often citizens do not want to deal with the issue personally and turn to intermediaries: the cost of their services reaches 20,000 rubles.
Interesting: How social security income certificates are checked
WOODEN EXTENSION
But with the wooden wall of the extension, certain difficulties may arise. Firstly, wood is a living material. The tree “breathes” and “walks” a little when the season changes. The extension has three walls. and not four, stacked like a well and supporting each other, so they need to be attached to the house more reliably. You can secure each log separately, for example, using metal corners on both sides.
The logs themselves must be fastened together with spikes every 1.5-2 m, having previously drilled through holes. Spikes for this are usually made of birch and are sold separately at construction markets and in stores.
The corners of the extension are folded in a special way. There are two main ways - in the paw and in the bowl. The log will look nice if you place it in a bowl so that its ends protrude 20-30 centimeters outward from the corners.
The beam is usually placed in the paw. All the same, walls made of timber 10-15 cm wide must be sheathed, pre-insulated, since a thickness of 15 cm is not enough for a warm extension.
Important!
For wooden construction, you need to buy timber that has been felled and cut down in winter. Such a tree has given up all its juices to the earth, it is already practically dry, and will warp less.
It’s even better if you cut down the dead wood.
Calculating the height of the extension wall (it can be, for example, 250 cm), add another extra log. The wood will dry out and the wall will shrink in a couple of years. Before covering wooden walls, for example, with clapboard, you need to wait a couple of years. so that the walls settle, otherwise the finish will warp. During the drying process of the logs, the seams between them will have to be periodically re-pierced with tow. And outside it can be pulled out by birds for their nests. And don’t forget to treat the tree with a remedy for rot and bark beetle!
Important!
When inserting windows, leave gaps of 3 cm on the sides and 10 cm on top of the frame, otherwise it will tear and the glass will fly out. Fill the gaps not very tightly with tow. Do the same with the door if you are going outside.
The extension usually has three walls. Of course, if you are building something unusual, then there may be more walls. In any case, there is a need to connect two of them to the main house.
Pseudo-frame extension for a house, sue the builder after construction
Steps to legalize construction
How to legalize an extension and where to start this procedure?
The procedure for legalizing the construction will begin immediately after completion. After erecting an unauthorized extension, there are the following options for how to legalize it to the house and obtain uniform title documents:
- apply to the local administration to legalize an unauthorized extension to the house,
- If approval of the application is refused, consent to the construction of this extension can be obtained in court.
There are special requirements for the process of legalizing an extension in court, since during the consideration of the dispute the applicant will have to prove the legality of his actions.
The algorithm of actions for legalizing an extension to a private house in 2017 through the judicial authorities consists of the following stages:
- contacting an engineer to carry out cadastral work and fix the technical parameters of an extension or a separate building,
- conducting an on-site survey and transferring data to the technical plan,
- contacting the owners of adjacent properties to obtain official consent from neighbors to erect a building,
- upon receipt of the specified consent, sign the approval act, and if there are objections, record them in writing (submitting objections does not always comply with the law, however, this fact must be reflected in the documents),
- receiving an official response from local authorities indicating the reasons for refusal of approval,
- filing a statement of claim in court indicating the grounds for recognizing the extension as complying with the requirements of the law.
These stages of the process of legitimizing an extension are aimed at confirming the rights to the erected structure and registering the new building.
The following points must be included in the content of the statement of claim:
- name of the judicial authority,
- personal data of participants in the process and interested parties (for example, owners of adjacent objects),
- evidence of rights to the land plot and the main building to which the extension was made,
- a description of the process of constructing an unauthorized object - on your own or by inviting a contractor,
- a list of actions taken by the applicant to resolve the dispute pre-trial,
- requirement to recognize the construction as legal and register rights to the specified object.
The defendant in cases of this category will be local authorities, for example, the administration of a municipality that refused to approve the facility.
The statement of claim must be accompanied by documentation drawn up by a cadastral engineer during an on-site inspection of the property, as well as acts of approval from specialized institutions - architectural authorities, fire supervision, Rospotrebnadzor authorities, gas services, etc.
These acts must be obtained at the stage of preparation for applying for legalization of buildings.
The choice of the judicial body in which the specified case will be considered depends on the value of the object. If the price of the statement of claim does not exceed 50 thousand rubles, the case is subject to consideration in the magistrate's court. If the specified amount is above 50 thousand rubles, the documents must be submitted to a court of general jurisdiction (district or city court).
A court decision will be the legal basis for registering a new building with the cadastral authorities and the Rosreestr service, after which the data on the extension will be entered into the Unified State Register of Real Estate, and a separate building can be registered as an independent property.
The status of a legalized type of housing makes it possible not only to avoid liability for unauthorized construction, but also allows you to dispose of these objects at your own discretion - sell to third parties, exchange, rent out for temporary use, etc.
INSULATION OF EXTENSION WALLS
Choose sheet insulation for walls. Rolled ones are suitable for insulating floors: they will slide off the wall. And it’s more convenient to work with sheet insulation. You can use mineral and stone wool or polystyrene foam. In private houses, mice can live in the insulation between the wall and the cladding. If you insulate your walls with foam plastic, be prepared for this!
Don't forget to use a vapor barrier. The vapor barrier film is designed so that air passes through only one side. Therefore, it is sewn to the wall with the front side facing out. Usually it is on this side that the inscriptions are located - for example, the brand name. If they are not there, keep in mind that the film is wound into a roll with the front side facing out.
Let's look at an example of insulating a wooden wall. The wall is covered with a vapor barrier using a construction stapler. The thickness of the stone wool slab is 5 cm. Wooden blocks also 5 cm thick are screwed to the wall with self-tapping screws (if the insulation is laid in one layer). Using fixing screws, the bars are adjusted in level. The distance between the slats will be equal to the width of the insulation board. Thermal insulation is installed into the resulting niches and covered with a vapor barrier film. Then clapboard or plastic siding is sewn to the bars.
Walls made of other materials are insulated using the same principle.
© Author: Alexey Vladimirov
How to register a house in SNT in 2020
- garages erected on a site that was given to a citizen for use;
- buildings under construction or constructed on a piece of land used for farming/gardening;
- auxiliary buildings.
The validity of such a regulatory act was extended three times - until 2010, then until 2020 and now until 2020. However, although the law defines the rules for registration, it still has its own difficulties and ill-conceived issues. And in order to register a house on a land plot in SNT, you need to understand the intricacies of this procedure.
06 Oct 2020 hiurist 351
Share this post
- Related Posts
- Is it possible to demolish a private residential building on state land?
- How to calculate a Housing Certificate for large families
- Benefits for labor veterans in 2020 in Komi
- Law on holidays in Crimea 2019
ROOF EXTENSION TO HOUSE
The roof of the extension is practically no different in design from the roof of the house. Still, there are some nuances that are important to consider.
Table. COMPARISON OF ROOFING MATERIALS BY MAIN CHARACTERISTICS.
| MATERIAL | LIFE , YEARS | ROOF ANGLE | WEIGHT, KG/M2 |
| Metal tiles | 10-50 | from 15th | 3-5 |
| Roofing profiled decking | 10-50 | from 10° | 5-6 |
| Ondulin, aqualin, euroslate | 15 | from 5e | 3-3,5 |
| Flexible/bitumen shingles | 20-70 | From 11th | 5-30 |
| Ceramic tiles | 80-100 | 25-60° | 35-65 |
| Sand-cement tiles | 30-100 | 20-60’ | 35-40 |
METAL TILES.
After studying the market for this roofing material, it seems that some manufacturers are ready to stamp metal tiles that are slightly thicker than foil. Now a sheet 3 m long needs to be torn off the ground by four people - one person on each side. Otherwise it will wrinkle.
Even the claws of crows leave marks on such a roof. But it's cheap. Therefore, savings should be reasonable: quality material should be chosen.
PROFESSIONAL DECORATING.
This is a fairly popular material, but, as in the case of metal tiles, its quality often leaves much to be desired. Unscrupulous sellers indicate the thickness of the sheet already taking into account the applied coatings, thereby misleading the buyer.
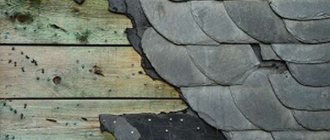
SOFT ROOF.
This material comes in a variety of shapes and colors. but has quite a lot of weight. It must be laid on a flat surface, that is, the roof should first be covered with either plywood or pressed chipboard. And this is additional weight. This means that the roof frame will have to be made stronger. We also take into account the fact that in winter snow does not move well from a rough surface and adds load. All this affects the final cost.
ONDULIN has become more expensive than metal tiles. Its installation also requires a solid, flat surface made of plywood or OSB.
I chose metal tiles for the roof of my extension. Summer rain knocking on the roof? Nothing like this! If the sheets fit tightly to the sheathing, the noise will be no louder than with any other roofing material. Good thermal insulation of the roof will also do its job: it is also sound insulation. If the extension has a small attic or similar, the air space between the roof and ceiling will also act as insulation.
I was building a gable roof. A full-fledged attic for the extension is not needed, so I simply made an air insulating space with the expectation that the ceiling of the extension would be flat and not broken. I laid 15 cm timber on the walls. One was against the wall of the main house, and the other was on the opposite edge of the extension. Between them, at the same distance from each other, placed beams of the same length. The distance should not exceed the width of the insulation sheets, which we will then lay.
On each side, the beam should protrude from the wall of the extension by 30-50 cm so that water flowing from the roof does not fall on the walls, but drains onto the ground away from the foundation. Ideally, flashings and gutters can be installed.
I took the height of the roof from the wall of the extension to the top point (ridge) to be 1 m with a wall width of 3 m. It turned out that the timber for the ceiling - the so-called logs - will be 4 m long. The usual length of the timber is 6 m. The remaining two-meter beams can be sawn Install meter-long supports in half and in the middle of the log to install the rafters. In addition, the remaining pieces of timber will go on the walls between the lags, which will seem to grow into the wall.
I prepared the rafters by cutting 6-meter boards in half, 10-15 cm wide and 2.5-4 cm thick. I nailed them (can also be secured with screws) on each side of the joist. If you take a board 4 cm thick, then one side is enough. To begin with, I installed rafters against the wall of the main house and on the opposite side of the extension. I aligned them relative to each other using a spirit level, stretching the twine between them. I installed the rest of the rafters, adjusting them to this level using twine. The lower edges of the rafters were aligned with each other in the same way.
Next, I made the roof sheathing from boards 2-2.5 cm thick - there is no need for thicker ones. But first I insulated the ceiling. Doing this later would be inconvenient. I lined the bottom joists with clapboard. As an alternative, I would recommend a 4 cm thick floorboard: it provides additional thermal insulation and looks smooth and not textured like lining.
I made a rough ceiling from simple boards, then covered them with laminate - this makes it much more convenient to work with insulation. I installed steam and heat insulation on the ceiling. I also laid a vapor barrier on top and sewed everything up with a board. It turned out to be a good sandwich. The thickness of the insulation layer is equal to the width of the beam - it can be compacted even thicker. Then I started laying the roof. The ceiling turned out to be quite strong, and therefore the rafters were sheathed not entirely, but through a board. The sheathing was also covered with a vapor barrier and metal tiles were laid. Condensation may form on the metal tiles below. To prevent this from happening, the under-roof space must be ventilated. If the ceiling is sufficiently insulated, this will not affect the temperature inside the room.
© Author: Alexey Vladimirov
Important!
The joint between the roof and the wall or gable of the roof of the house should be closed with a special profile using seals or roofing sealant. If the roof is connected to a stone structure, a groove 20 mm deep should be cut into the wall. The upper bend of the profile is mounted into it.
How to attach a new House to an old one? Sedimentary seam?
Steps to legalize construction
How to legalize an extension and where to start this procedure? The procedure for legalizing the construction will begin immediately after completion.
After erecting an unauthorized extension, there are the following options for how to legalize it to the house and obtain uniform title documents:
- apply to the local administration with an application to legalize the unauthorized extension to the house;
- If approval of the application is refused, consent to the construction of this extension can be obtained in court.
There are special requirements for the process of legalizing an extension in court, since during the consideration of the dispute the applicant will have to prove the legality of his actions.
The algorithm of actions for legalizing an extension to a private house in 2017 through the judicial authorities consists of the following stages:
- contacting an engineer to carry out cadastral work and fix the technical parameters of an extension or a separate building;
- conducting an on-site survey and transferring data to the technical plan;
- contacting the owners of adjacent properties to obtain official consent from neighbors to erect a building;
- upon receipt of the specified consent, sign the approval act, and if there are objections, record them in writing (submitting objections does not always comply with the law, however, this fact must be reflected in the documents);
- receiving an official response from local authorities indicating the reasons for refusal of approval;
- filing a statement of claim in court indicating the grounds for recognizing the extension as complying with the requirements of the law.
These stages of the process of legitimizing an extension are aimed at confirming the rights to the erected structure and registering the new building.
The following points must be included in the content of the statement of claim:
- name of the judicial authority;
- personal data of participants in the process and interested parties (for example, owners of adjacent objects);
- evidence of rights to the land plot and the main building to which the extension was made;
- a description of the process of constructing an unauthorized object - on your own or by inviting a contractor;
- a list of actions taken by the applicant to resolve the dispute out of court;
- requirement to recognize the construction as legal and register rights to the specified object.
The defendant in cases of this category will be local authorities, for example, the administration of a municipality that refused to approve the facility.
The statement of claim must be accompanied by documentation drawn up by a cadastral engineer during an on-site inspection of the property, as well as acts of approval from specialized institutions - architectural authorities, fire supervision, Rospotrebnadzor authorities, gas services, etc.
These acts must be obtained at the stage of preparation for applying for legalization of buildings.
The choice of the judicial body in which the specified case will be considered depends on the value of the object. If the price of the statement of claim does not exceed 50 thousand rubles, the case is subject to consideration in the magistrate's court. If the specified amount is above 50 thousand rubles, the documents must be submitted to a court of general jurisdiction (district or city court).
A court decision will be the legal basis for registering a new building with the cadastral authorities and the Rosreestr service, after which the data on the extension will be entered into the Unified State Register of Real Estate, and a separate building can be registered as an independent property.
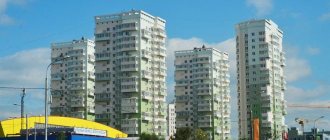
EXTENSION TO A HOUSE: DESIGN ACCORDING TO NEW RULES
Today we will talk about designing an extension to the house. In principle, what an extension is from a household point of view is clear to everyone. An addition to the house is being made that was not planned in the previous project. For example, a terrace or veranda, a summer kitchen or a living room is attached to one of the walls of the house (or even two). Even a garage can be attached. The extension can be of any number of floors, size, etc. Naturally, within the limits established by law. Thus, the height of an individual housing construction project (IHC) should not be higher than 20 m.
How does the law define an extension? In the Town Planning Code of the Russian Federation (GrK), the concept of “extension” is absent. However, paragraph 14 of Article 1 defines the reconstruction of capital construction projects. It is understood as “a change in the parameters of a capital construction project, its parts (height, number of floors, area, volume), including superstructure, reconstruction, expansion of a capital construction project, as well as replacement and (or) restoration of load-bearing building structures of a capital construction project, with the exception of replacing individual elements of such structures with similar or other elements that improve the performance of such structures and (or) restoring these elements.”
As you can see, the extension, which we talked about at the beginning of the publication, is covered by the concept of “reconstruction”. That is, an extension is a reconstruction of an existing capital construction project (in our case, a residential or garden house). This is what you should proceed from when starting to build an extension.
About the goals of innovation
Please note: the new regulations apply equally to both construction and renovation. Although, of course, the new rules were adopted primarily with the aim of preventing the illegal construction of a house, and not its reconstruction, which usually corresponds to the parameters of a residential building and the implementation of which much less often violates established requirements.
In other words, we must be guided by the new provisions of the Civil Code, which were introduced by Federal Law No. 340 of August 3, 2020. It follows from them that now, when reconstructing an individual housing construction project, as well as a residential building, a garden house, it is not necessary to obtain a construction permit. But this does not mean that the authorities have given free hands to citizen developers and allowed them to carry out any construction manipulations with their houses to their taste and discretion. Perhaps it's the opposite. A new article 51.1 has been introduced into the Civil Code, which is called “Notification of the planned construction or reconstruction of an individual housing construction project or garden house.”
From the title of Article 51.1 it is clear that local authorities must now be notified in advance, even before the reconstruction of the house begins. That is, it will no longer be possible to carry out the extension first and then legalize it retroactively.
What is required to be included in the notice of a planned extension? In addition to information about the owner of the property and the land plot, it is necessary to inform about the planned parameters of the individual housing construction project, including setbacks from the boundaries of the land plot.
In other words, local authorities must know how the property will change after the extension is completed: in particular, whether the distance to the site boundary will become less than the minimum (3 m).
You will learn how to proceed next from the response of the local government authority.
© Author: Yuri Volokhov
Extension to the house. HOW TO LINK THE WALL OF THE EXTENSION TO THE MAIN HOUSE.⚒
Important!
The notification form must be approved by the authorized government agency; perhaps it will contain other sections that reflect the specifics of the planned reconstruction, and not the construction of the house.
How to register an extension to an apartment building: list of documents
To build an extension in a multi-story building, you will need permission not only from the authorities, but also from the neighbors. Now we will talk about the documentary part .
Paperwork for this part of the house is necessary in the following cases:
- before the start of construction,
- when the structure has already been built, but is declared illegal.
In multi-storey buildings, extensions most often come in the following types:
- non-permanent structures - they do not have a foundation or they can be easily dismantled without the need to erect walls (sheds, etc.), in such cases, the consent of neighbors or permission from the authorities is not needed, a reconstruction act is simply drawn up,
- capital structure - such objects can directly affect the technical characteristics of the building and change its infrastructure (for example, a veranda or balcony); documented consent of neighbors and official authorities is required here.
To build permanent buildings, you need to prepare the following package of documents:
- consent to the construction from all the neighbors in the house - the resident of each apartment must sign that he is not against your extension,
- project of the future building,
- ownership documents:
- room plan,
- permission from Rospotrebnadzor,
- official permission from the local architectural committee and fire department.
When construction work is completed, an acceptance certificate should be drawn up, which must be signed by members of the acceptance committee:
- apartment owner,
- neighbours,
- representative of the design organization,
- representative of the local administration.
After signing the act, the registration of a technical passport is ordered from the BTI, and changes are also made to the certificate for the apartment.
To register an existing extension, you need the following documents:
- ownership documents,
- extract from the house register,
- permission from BTI,
- written consent of neighbors for construction,
- acts on the presence or absence of communications located in close proximity,
- design and plan of the built-in premises,
- photograph of the building.
Samples of the design of each document can be easily found on the Internet and based on them you can create your own.
HOW I BUILT AN EXTENSION TO A HOUSE - VIDEO
Extension to the house
TOOLS FOR CRAFTSMAN AND CRAFTSMAN, AND HOUSEHOLD GOODS VERY CHEAP. FREE SHIPPING. THERE ARE REVIEWS.
Below are other entries on the topic “How to do it yourself - for a homeowner!”
- Do-it-yourself extension to a house (photo) How to build an extension to a house….
- Do-it-yourself extension to a house - projects and advice from an architect What kind of extension to a house to make...
- Replacing the beam of the bottom trim in a frame house How to replace a rotten log (beam...
- How to save trees when building or expanding a house We save trees when we build a house...
- Do-it-yourself extension to a house from A to Z - drawings and construction progress Do-it-yourself extension to a country house...
- How to enlarge a house - options for extensions How to build a country house that...
- Do-it-yourself greenhouse extension from slats (photo) How to make a greenhouse extension A friend for…
Subscribe to updates in our groups and share.
Let's be friends!
With your own hands › Construction › Do-it-yourself extension to the house from A to Z
Legalization of unauthorized buildings
Legalization of unauthorized construction
The preparatory procedure and official legalization of an extension to a house before its construction does not take much time.
However, according to statistics, 80% of a hundred homeowners begin collecting documents and registering capital structures after their construction.
The worst thing is if the registration of unauthorized construction begins years later, when it becomes necessary to carry out transactions with real estate, selling it or re-registering it to another owner.
In these cases, legalization will have to begin with the courts. The plaintiff is the owner of the suburban area, and the municipal authorities are the defendant.
The homeowner, as a plaintiff, may go to court not only in cases where it is necessary to legalize an unauthorized extension, but also when the competent authorities refuse to issue a permit for new construction.
In both cases, a package of supporting documents must be attached to the statement of claim written according to the established template. These include previously obtained permits and approvals for the construction site and design documentation.
If the court decision is positive (and, more often than not, it happens), the homeowner receives the appropriate legal document and a receipt for payment of penalties for documentation not completed on time.
When preparing a package of documents for the court, you need to pay attention to the following:
- All documentation must be completed in accordance with current building codes.
- Originals of all documents confirming ownership rights are required.
- All applications and permissions must be handwritten by the signatory or certified by a notary (consent of co-owners, neighbors).
- It is mandatory to certify that the materials used in the construction of the extension are environmentally friendly and comply with sanitary standards.
The court's refusal is valid in cases of an incorrectly or negligently executed package of documents or when an unauthorized structure was constructed in violation of construction or sanitary and epidemiological standards. Also, a refusal to register can be issued by a court if the structure endangers the lives of people or was erected in violation of the legal and legal rights of co-owners of the property and neighbors.